How to Import Your Book Into the Writing Studio
Bring a finished Word or ePub manuscript into the Writing Studio, check the chapters, review your front matter and pictures, and keep writing.
Quick Start
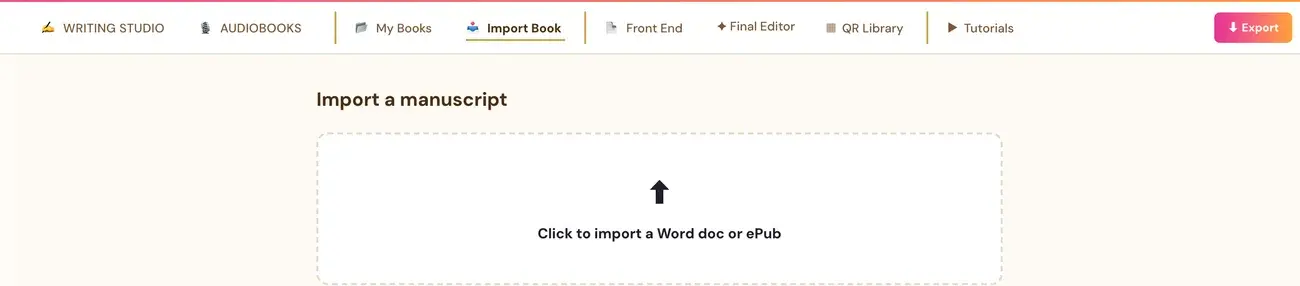
If you already wrote your book somewhere else, you do not have to retype it. The Import Book tab reads the real file and automatically splits it into the Writing Studio's normal chapter and section structure.
- Make sure your book is a Word (.docx) or ePub (.epub) file. PDF is not supported.
- Click the Import Book tab and click the box Click to import a Word doc or ePub.
- In Name your book to import it, fill in Book title, Author name and Language.
- Click Choose file to upload, pick your file, and wait while the studio reads it.
- Check your chapters, then open the Front End tab to review what was filled in for you.
Full Guide
Step 1: Prepare your file
Only two file types are accepted: Word (.docx) and ePub (.epub). Word and Scrivener (exported to ePub) are examples of where a book may have been written. If your manuscript is only a PDF, it will not work here. Open it in Word, or export it to Word or ePub from whatever program made it, then import that file. You can also use a free online converter. See Can I import a PDF?
For a Word file, the more visually distinct the real chapter headings are in the original file, the more reliable the detection is. The question to ask is whether the headings are genuinely bold or larger than the body text, or just written in regular text.
Step 2: Know the three buttons at the top of My Books
Three buttons at the top of the My Books tab start a new book, each doing something different:
- + Import External Book is for a book you already wrote elsewhere (Word or ePub). It opens the Import Book tab.
- + Create New Book is a genuinely blank book, starting from nothing. It asks for a working title, author name and language before creating it.
- + Pull Latest Outline pulls in the most recent output from your Chapter Detail Generator (Step 3 · BUILD) as a ready-to-write outline. If you have more than one Project set up (My Projects), it opens a dropdown so you pick which project's outline to pull. If you have no projects yet, the dropdown shows "No projects yet."
You are here for the first one.
Step 3: Connect a storage platform
The very first time you click "+ Create New Book" or "+ Import External Book", you are shown a "Choose your storage platform" screen before you can proceed. The choices are Google Drive, Dropbox, OneDrive and Save to This Computer.
Why does it ask? Connecting your own storage means a real backup copy of your book lives somewhere that is genuinely yours, not just inside this app. It is a one-time connection. Once you connect, it is remembered for every future new or imported book anywhere in the app.
Good to know:
- If you pick Google Drive, right after connecting you are also asked to choose or create a real folder in your own Drive. This is required, and you can change it anytime later from Account Settings → Connected Services. Dropbox and OneDrive do not have this extra step. Their app folder is created automatically.
- Save to This Computer is also the answer if you want your book in iCloud. Apple does not offer an iCloud connection, so point "Save to This Computer" at a folder inside your Mac's iCloud Drive, and iCloud's own built-in sync takes it from there. In Chrome or Edge you pick (or create) a real folder once, and every future save writes there automatically. Safari, Firefox and Brave cannot remember a folder at all. On those browsers this option still works, it just asks you to choose a save location every single time.
- Your typing autosaves to the app's own database regardless of whether cloud storage is connected. Connecting your own storage adds a second backup copy that also saves to your Drive, Dropbox, OneDrive or computer folder in the background.
- If you close the "Choose your storage platform" screen with the × instead of connecting, closing it cancels that specific action entirely. No book gets created and nothing gets saved anywhere for that attempt. Click to import again and connect a provider.
See How do I connect cloud storage?
Step 4: Name your book
After you click the box, a window called Name your book to import it opens. Fill in:
- Book title
- Author name
- Language
Step 5: Choose your file
Click Choose file to upload and pick your .docx or .epub file.
If you pick another file type, you see the message "Please upload a Word doc (.docx) or ePub (.epub) file."
Step 6: Wait while the studio reads your book
For a Word file, you may see "Analyzing book structure…". The app reads the document's real paragraph structure and formatting (which paragraphs are bold, which are large), then an AI step identifies which paragraphs are genuinely chapter headings versus just bold or large body text. That step is why a big manuscript can take a little while to import: it is reading the whole book's structure, not just splitting on page breaks.
For an ePub, most of the time no AI step is needed at all. The ePub already has its own built-in table of contents that says exactly what the real chapters are, so the app just reads that directly. Occasionally, with some export tools like Scrivener, an ePub's built-in table of contents does not actually list the real chapters. In that case the app automatically falls back to the same AI structure-detection step that Word uses.
Step 7: Check that the import was confirmed
Only a confirmed server save is a successful import. If you see an error or missing content, keep your original file, note the exact message, and check the intended book in My Books before reimporting. Follow any sign-in or cloud-connection prompt. Repeated failure or missing content goes to contact@goldenbestseller.com, with the stage or message and a screenshot if helpful. Never send secret keys.
Step 8: Check the chapter list
Open the Writing Studio tab and look at the chapter list. Compare it with your original file. If the split has way too many or way too few chapters, it is not something you did wrong. See My import split into too many or too few chapters for the manual fix with + ADD CHAPTER, the × controls and cut-and-paste.
If a Word file has no detected or styled chapter headings at all, it imports as one chapter and keeps the first paragraph. That is a fallback, not automatic recognition of unstyled chapter titles.
Step 9: Review the Front End tab
The book's title page, copyright and legal-notice content is intentionally not imported as a chapter. Import automatically reads that same leading content and prefills as much of the Front End tab as it can find: subtitle, copyright holder, publisher, edition, ISBN, trademarks (even ones mentioned inline in a sentence, not just in a clean list), cover design credit and dedication. Anything real it finds that does not fit one of those exact fields lands in Additional Fields.
Open the Front End tab and look over what is already filled in. It is a starting point to check over, not something to fill in from scratch. Anything the automatic read did not catch, or got wrong, you can type or fix directly. See How to Set Up Your Front Matter on the Front End Tab.
Step 10: Check your pictures, links and Parts
- Images: real embedded images are pulled directly from your file, and automatically upscaled if they are below Amazon's print-quality threshold. You do not need to separately re-insert or upscale them. For adding pictures and ALT text in the Writing Studio, see How to Add Images and ALT Text.
- Links: real hyperlinks in the original file are preserved in the imported chapters. They work normally in the ePub export and in the Writing Studio editor. They are removed only from the print and PDF version, because a clickable link cannot safely exist in a print file and Amazon's KDP print system rejects files that have one. See Why are links not clickable in my print PDF?
- Parts: a book's real Parts, a structural grouping above individual chapters like "PART 1: Getting Started" containing several chapters under it, are detected automatically. They are shown visually larger and bolder with their chapters nested underneath, both in the Writing Studio's chapter list and in the exported book. Not every book has real Parts. Most do not, and that is normal.
Step 11: Know that every import is a new book
Every click of "Import Book" creates a brand-new manuscript. It never updates or replaces an existing one. Each import creates a separate book, and a same-title warning allows an intentional new copy (Import as new copy). If you import a revised file, you will have two copies.
Open the candidate copies and compare the chapter list and the actual text. Do not identify a "real" copy, or delete another, solely from timestamps. Keep every copy until you have verified the contents and have a backup. Similar titles in your book list may be intentional drafts.
Step 12: Keep going
Once the import looks right, you can keep writing in the Writing Studio, check Page Preview and export. Everything you type saves automatically about half a second after you stop typing. The bottom bar shows "Saving…" and then "✓ All changes saved".
Troubleshooting
My PDF will not import. PDF is not supported. Open it in Word, or export it to Word or ePub from whatever program made it, then import that file.
My copyright page is missing from the chapters. It is intentional. Import prefills the Front End tab instead. Check the Front End tab first.
I got a different number of chapters than my book has. This is a real, occasionally imperfect AI judgment call, not something you did wrong. Fix it by hand with + ADD CHAPTER, the × controls and cut-and-paste.
I imported twice and now I have two books. Every import creates a separate book. Open both from My Books, compare the chapter list and actual text, and keep both until you are sure.
The import took a while. For a large Word file, the studio is reading the whole book's structure.
The import asked me to connect storage. That is a one-time step for creating or importing a book.
I do not see my links in the PDF. They are removed from the print and PDF version on purpose.
Where to Go Next
When your book looks right, set up the front pages with How to Set Up Your Front Matter on the Front End Tab, then see how it prints in How to Use Page Preview, Formats and Templates. Not sure where to start? The Course Coach inside the app guides you through each step, so you are never stuck on a button.
Related Tutorials
Last checked in the app: October 14, 2026.
Still Need Help?
Inside the app, the Course Coach answers your questions and guides you step by step. You can also write to us and we will get back to you.
Contact Support