
How to Write Your First Section in the Writing Studio
Open a section, read its prompt and goal, write in your own words, proofread, get editing notes and check the page. A gentle first-section walkthrough.
Quick Start
On the Step 4 · WRITE roadmap page, the writing flow is: Chapter Arc + Goal (already planned for you), Writing Prompt (guidance inside each section) and Your Draft (write, dictate, or get AI help). Here it is in seven steps.
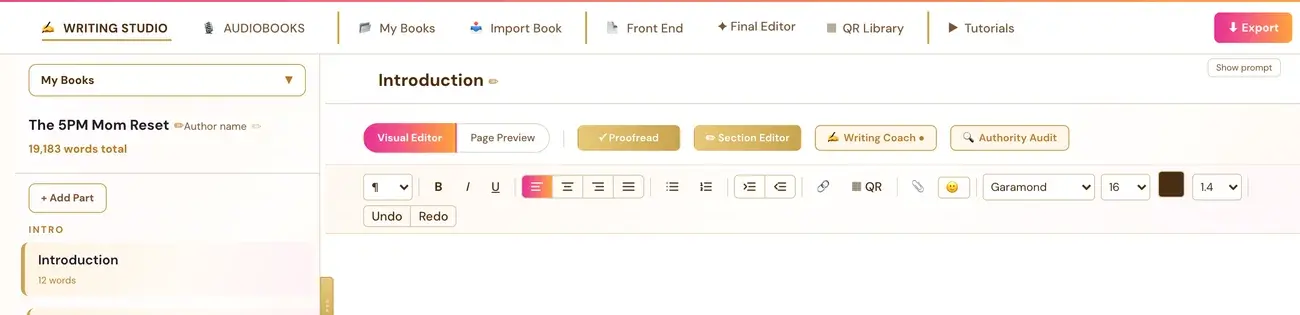
- Open your book in the Writing Studio and click a section in the chapter list.
- Read the Writer's Prompt and The Goal.
- Write in the Visual Editor, by typing, pasting or dictating.
- Watch your word count against the target in the bottom bar.
- Click Proofread to catch spelling and grammar.
- If you like, ask the Section Editor for editing or the Writing Coach for ideas.
- Switch to Page Preview to see how the page will look in print.
Everything auto-saves as you type.
Full Guide
Step 1: Open your book and your outline
Click the Writing Studio tab. A freshly generated outline comes into the Writing Studio one of two ways.
- Click through directly from the Chapter Detail Generator (Step 3 · BUILD) right after generating. This applies the new outline immediately and prompts for a working title.
- From inside the Writing Studio: if the current book has no outline yet, Pull latest outline fetches your most recent Chapter Detail Generator result and applies it, and Paste outline lets you paste one in manually. Both are in the Chapters panel.
For a genuinely blank book, use + Create New Book. It asks for a working title, author name and language before creating it.
The first time you create or import a book, you are shown a "Choose your storage platform" screen (Google Drive, Dropbox, OneDrive or Save to This Computer). It is a one-time connection. See How do I work on more than one book?.
Step 2: Open a section
In the chapter list on the left, click a chapter title to expand it and see its sections. Click any section name to jump directly to that section in the editor.
If you need more chapters or sections, see How do I add chapters and sections?.
Step 3: Read the Writer's Prompt and The Goal
The Writer's Prompt is the guidance for that specific section, pulled from the Chapter Detail Generator. The Goal line, shown in italics after "The Goal:", is the specific objective for that section.
If you want more room, click Hide prompt. You can bring it back with Show prompt. See How do I show or hide the Writer's Prompt?.
Step 4: Check your word target
The bottom bar shows "X / Y words" with a progress bar. The target (Y) comes from the Chapter Detail Generator. You can click the target number to change it. See How do word count targets work?.
Step 5: Write in your own words
Use the Visual Editor, the writing mode. The roadmap says you can write from scratch, dictate your ideas, or let your AI Writing Coach help you develop them. The Writing Studio keeps your expertise, stories, ideas and voice at the center.
- Type straight into the section.
- Paste from Word, Google Docs, an AI chat or a website. Whatever is pasted is cleaned automatically: the source's colors, font sizes and fonts are removed, and bold, italic, links and lists are kept. See What happens when I paste text?.
- Dictate by clicking Dictate in the bottom bar and speaking. See Dictate Your Book.
For a sub-heading inside your text, use the Paragraph style dropdown and choose H3 or H4. See Which heading levels can I use?.
Step 6: Get help if you feel stuck
The roadmap's "But I'm not a writer…" list says: work one section at a time, use prompts and coaching, your ideas, not AI fluff, and nothing is final until you say it is.
- Click Writing Coach for questions, feedback and ideas. If you ask it to write or draft a section, or part of one, it will do that in your voice, from your book details and draft so far, and then invites you to adjust it. Save a sample of your own writing under 🎙 My writing voice so it sounds like you. See How do I use the Writing Coach?.
- Click Section Editor for an AI editing conversation focused on the current section. See What is the Section Editor?.
These tools use your own AI key. Connecting it is super easy. It takes only a few seconds, and the app guides you through it step by step. Using your own key is free or costs very little, and Gemini has a free tier.
Step 7: Proofread the section
Click Proofread. It finds spelling mistakes, punctuation errors, double spaces, capitalization issues and grammar problems, and highlights each one directly in the text.
- Click Fix All to accept everything at once.
- Or click an underlined word and choose Fix it or Leave.
- Click Done when you finish.
While proofread results are showing, the text is read-only. Clicking Done in the banner switches it back to normal editing. See Is there a spell check?.
Step 8: Look at the page in Page Preview
Switch to Page Preview. It shows the literal real print-ready PDF page for the current chapter, generated the same way as the final export, not an approximation. Margins, running headers, fonts and page breaks are exactly what will print. When you are done, switch back to Visual Editor.
For layout choices such as Format, Template and Paragraphs, see Format, Template and Paragraph style.
Step 9: Keep your book safe
Everything you type saves automatically into this app's own database. The bottom bar shows "Auto-saved", "Saving…" and then "✓ All changes saved." You can also click Save to Your Cloud in the bottom bar to place a backup copy of the whole book in your own storage. See How does autosave work?.
If the bar ever says "Not saved — retry", keep the page open, copy any unsaved text somewhere safe, and use the retry.
Step 10: Move to the next section
Click the next section in the chapter list. The app remembers which chapter and section you were last working on and reopens right there.
Troubleshooting
I cannot type. If you just ran Proofread, click Done in the banner. If you just came back from another page, the text cannot be edited for a moment while the newest saved copy loads and replaces it, then typing works normally.
The Writing Coach asks me to connect a key. Click Connect Claude → (or pick Gemini or ChatGPT) and follow the instructions in the setup panel. It takes only a few seconds. This is a one-time setup.
My word target is 0. The word target comes from the Chapter Detail Generator. Run it for that section first, then come back.
My content disappeared. First check the easy explanations: try the Refresh button in the bottom bar, confirm you are in the correct manuscript (the dropdown at the top of the Chapters panel), and the correct section. Most "missing" content is just being viewed in the wrong place. If it is genuinely gone after checking those, contact support. Every save is kept permanently, so your work is very likely still recoverable.
Where to Go Next
Next, learn to speak your book with Dictate Your Book, or add pictures with How to Add Images and ALT Text. The Course Coach inside the app guides you through each step, so you are never stuck on a button.
Related Tutorials
Last checked in the app: October 14, 2026.
Still Need Help?
Inside the app, the Course Coach answers your questions and guides you step by step. You can also write to us and we will get back to you.
Contact Support