A Tour of the Golden Bestseller Empire Writing Studio
A calm, step-by-step tour of the Writing Studio: the tabs, the chapter list, the editor, the action buttons and the bottom bar, so you know where everything is.
Quick Start
The Writing Studio is where you write your actual book, section by section and chapter by chapter. On the Step 4 · WRITE roadmap page it is described like this: "You bring the book. Your Writing Team helps with the heavy lifting." Here is the shortest tour.
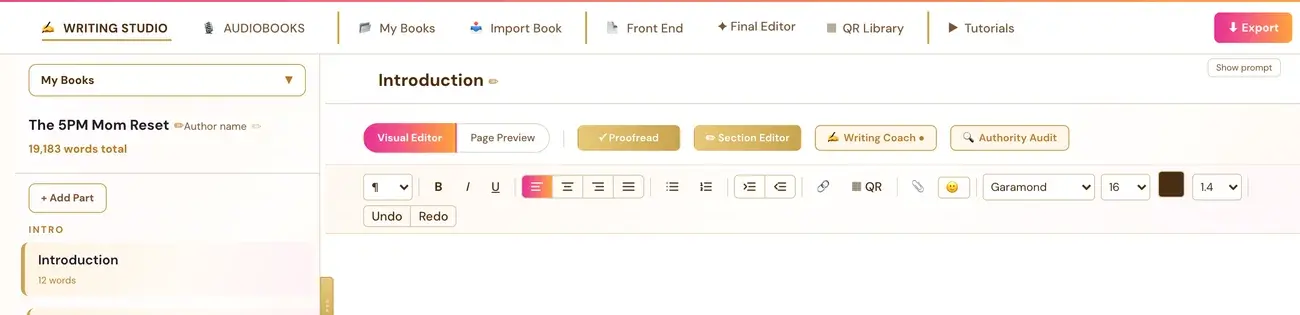
- Look at the tabs along the top. Writing Studio is where you write.
- Use the chapter list on the left to move between chapters and sections.
- Write in the Visual Editor. The four action buttons beside it are Proofread, Section Editor, Writing Coach and Authority Audit.
- Watch the bottom bar for your save status, your word count, Save to Your Cloud and Dictate.
- Use Page Preview to see the printed page and Export to download your book.
Everything auto-saves as you type.
Full Guide
Step 1: Know what the Writing Studio is
The Writing Studio is a full book-writing environment with AI coaching, word count targets, proofreading and one-click export to PDF and ePub. On the Step 4 · WRITE roadmap page, the Writing Team list says: write with your chapter plan beside you, dictate your ideas (hands-free writing), coach, edit and polish as you go, research claims and build your sources, format beautiful print and eBooks, and export files ready for publishing.
The roadmap's feature list for the Writing Studio reads: Write & Edit (rich text tools), Dictation (hands-free), AI Writing Coach (ideas and feedback), Authority Audit, Images, QR Codes, Quotes (beautiful styles), Action Boxes (exercises and prompts), Book Formatting (multiple sizes), eBook Formatting (EPUB-ready) and Export (PDF and EPUB).
Step 2: Learn the tabs at the top
The tabs run from left to right.

- Writing Studio: The main writing environment (chapters and sections).
- Audiobooks: Converts the manuscript to a narrated audiobook.
- My Books: All manuscripts in one place. Download PDF, ePub or Hardcover versions, and open any project to continue writing. See How do I work on more than one book?.
- Import Book: Bring in an existing manuscript from a Word document or an ePub file.
- Front End: Book front matter: title page, impressum and table of contents settings. They all auto-populate into the exported PDF and ePub.
- Final Editor: A final review and polish pass across the whole manuscript before export. See What is the Final Editor?.
- QR Library: Paste any URL (website, lead magnet, Amazon Author page, course) and a label to generate a print-resolution QR code that goes inside the printed book. It is fully manual. Nothing is pulled in automatically, and you paste each URL yourself.
- Tutorials: How-to videos for every part of the Writing Studio and Audiobook Creator.
If you remember an old Back End or Interior Bio tab, it is gone. The author bio, lead magnet and social links that go in the back of the book are now written the same simple way as any other chapter, as one of the last chapters in the normal chapter list. That is easier to write and edit than the old separate page.
Step 3: Use the chapter list on the left
The left sidebar lists all chapters and their sections in order.
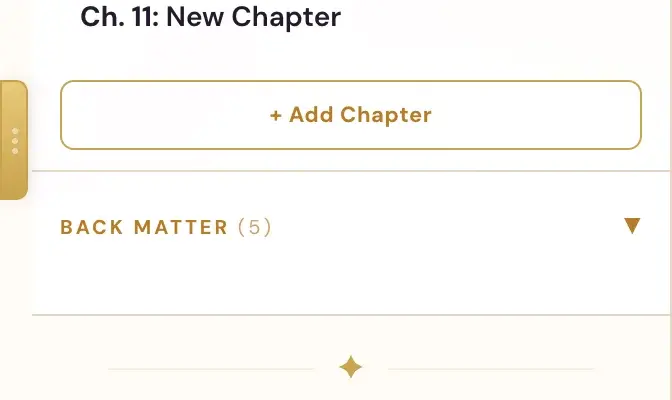
- Click a chapter title to expand it and see its sections.
- Click any section name to jump directly to that section in the editor.
- Click the thin strip on the right edge to collapse the sidebar. Click it again to bring it back.
- At the top of the sidebar is a dropdown showing the current book name, and a + button to create a new manuscript.
- Back Matter is the last entry inside the same scrollable chapter list. Click it to expand or collapse it, just like a chapter. The Bibliography, built from the Authority Audit's citations, lives inside it.
On a new book, the front-matter pieces ("A Note Before You Start," "Introduction," "Who This Is For," "How to Use This Book," "A Note From the Author," and so on) are combined into one real Introduction chapter, with each piece shown as a section underneath it. An older book keeps the shape it had. That is correct.
To add chapters or sections, see How do I add chapters and sections?.
Step 4: Find your way around the editor
The section title shows at the top of the main editor area. Next to it you also see:
- The Writer's Prompt: The AI-generated guidance for that specific section, pulled from the Chapter Detail Generator (Step 3 · BUILD). Click Hide prompt or Show prompt to toggle it. See How do I show or hide the Writer's Prompt?.
- The Goal: The specific objective for that section, shown in italics after "The Goal:".
Step 5: Choose Visual Editor or Page Preview
- Visual Editor: The writing mode, with the formatting toolbar.
- Page Preview: Shows the literal real print-ready PDF page for the current chapter, generated the same way as the final export, not an approximation. In this mode you also see the Format, Template and Paragraphs controls, Pull Quote and Full Screen. Full Screen opens a larger 2-page spread view, like an open book, with page navigation.

Write and format in the Visual Editor. Check how it looks in Page Preview. For the toolbar buttons, see What does each toolbar button do?.
Step 6: Meet the four action buttons
In the Visual Editor, four buttons sit right next to the Visual Editor and Page Preview tabs.
- Proofread: This is the spell check and grammar check. See Is there a spell check?.
- Section Editor: An AI editing conversation focused on the current section. See What is the Section Editor?.
- Writing Coach: Questions, feedback and ideas, and a draft if you ask for one. See How do I use the Writing Coach?.
- Authority Audit: Reviews a chapter or your whole book for claims, statistics and research, and suggests citations for you to check. See What does the Authority Audit do?.
The Writing Coach, Section Editor and Final Editor use your own AI key. Connecting it is super easy. It takes only a few seconds, and the app guides you through it step by step. Using your own key is free or costs very little, and Gemini has a free tier. Connect once and all three work.
Step 7: Use the bottom bar
The bar along the bottom of the writing area has:
- Autosave status: "Auto-saved", "Saving…" and then "✓ All changes saved."
- Word count "X / Y words": Y is the section's word target (click the target number to change it), with a progress bar and percentage when a target is set. See How do word count targets work?.
- Save to Your Cloud: A backup copy of the whole book in your own storage. See How does autosave work?.
- Dictate: Voice input. Click once to start, and click again ("Stop recording") to stop. See Dictate Your Book.
Step 8: Add pictures, links and extras
The formatting toolbar has a paperclip button for pictures, QR code insert, a Link button and an emoji picker (🙂). For pictures, follow How to Add Images and ALT Text.
Step 9: Export when you are ready
The Export button is in the top-right corner of the Writing Studio. It offers ePub, plus PDF in six sizes: paperback 6×9, 5.5×8.5 and 5.25×8; workbook 8.5×11; hardcover 5.5×8.5 and 6×9. Make sure you have filled in the Front End tab first (title, author name, ISBN), because those fields populate the title page and impressum automatically. You can also download PDF or ePub from My Books.
Troubleshooting
I cannot find a tab. On a phone the row of top tabs swipes sideways. See Can I use the Writing Studio on a phone?.
I cannot type after running Proofread. Click Done in the Proofread banner.
I cannot see my Writer's Prompt. Click Show prompt in the top right of the editor area. If there is no prompt, run the Chapter Detail Generator for that section first.
My word target says 0. The word target comes from the Chapter Detail Generator. Run it for the section, then come back.
A coach button asks me to connect a key. Follow the setup panel. It takes only a few seconds and the app guides you step by step.
Where to Go Next
Ready to write? Follow Write Your First Section. The Course Coach inside the app guides you through each step, so you are never stuck on a button.
Related Tutorials
Last checked in the app: October 14, 2026.
Still Need Help?
Inside the app, the Course Coach answers your questions and guides you step by step. You can also write to us and we will get back to you.
Contact Support